Dealing with confidential information is an important issue for many organizations, especially if they have a strict set of requirements defined by an external governing body, such as the Federal Government. Ensuring that access is restricted in a prompt and final manner is required in most cases.Relying on administrators or basic users to deal with confidentiality concerns on a daily basis can be difficult, as the chances for information being improperly dealt with is high. A much better option is to utilize the system itself to automate this kind of security trimming.
Using Collabware CLM features in a creative way, it is possible to ensure the automatic security trimming of documents based on any type of metadata input, highly increasing the potential for all confidential information to be secured properly and immediately, regardless of where it lives in SharePoint.
There are three main Collabware CLM features that will be utilized in order to achieve this level of automated security settings: Auto-Apply Access Control Levels, Content Rules, and Populate Value. This article will be more hands-on, going step-by-step through the process of setting up this feature.
Auto-Apply Access Control Levels
Our first step is to create our Access Control Level for Confidential Information. This will define both the users who are allowed to see the documents, as well as what permissions they have with the documents. Since Access Control Levels are mapped to Active Directory Users, they are very secure, effectively preventing any kind of unauthorized access.
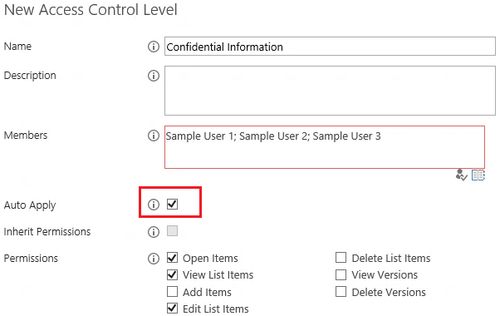
Collabware CLM’s Access Control Levels are defined on the Security page of Lifecycle Management. Your Access Control Level should look something similar to this:
 AutoApply ACL
The most important thing to note on this screenshot is the Auto Apply box, which has been checked on. Without Auto Apply on, Item-Level Security cannot be applied. Another thing to note is the level of permissions assigned. While these Users have the ability to view and edit confidential documents, they are not authorized to delete them.
Our next step is to ensure that the system can use this Access Control Level to apply security. This is done by adding a Metadata Column onto the SharePoint Content Type that is mapped to the Access Control Level Term Set.
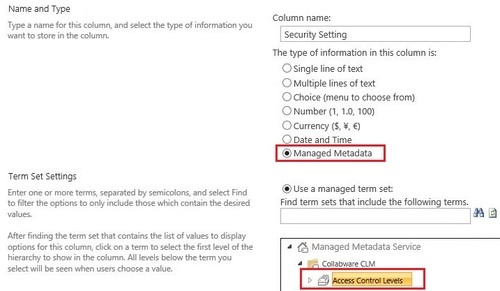
For simplicity’s sake, let’s use to default Content Type, the Document. We will be adding a new SharePoint Column onto this Content Type. The SharePoint Column will be a Managed Metadata Column that points to the Collabware CLM Access Control Level Term Set.
 2
2
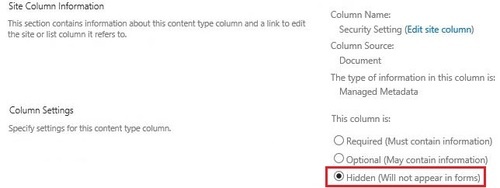
The screenshot above, while modified slightly, shows the basic configuration needed for this kind of metadata column. Make sure to republish the Content Type after you have modified it. Another trick that can be done with this field is to set it to “Hidden”, ensuring that your users don’t get confused or misapply security settings.
 Hidden
Content Rules
Now that we have our published Content Type ready to go, we need to create a Content Rule that will capture this document properly. Here is where we can be a bit more flexible. Any Content Rule will do, it simply has to capture Confidential Records properly. Even the simplest Content Rule can work as long as your Record Categories are properly separated between Confidential Categories and Non-Confidential Categories.
 Content Rule 1
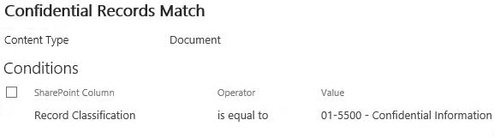
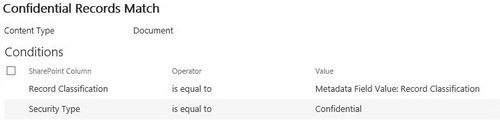
The above screenshot shows the most basic match possible; user inputs the correct Record Classification. A more complex rule might make use of a metadata field set by the user, specifying that it is a Confidential Record.
 Content Rule 2
Any other type of Content Rule can be used for this, including Content Type specific rules, or any combination of metadata. The most important thing to recognize here is that this Content Rule should match your Confidential documents to the correct Record Category.
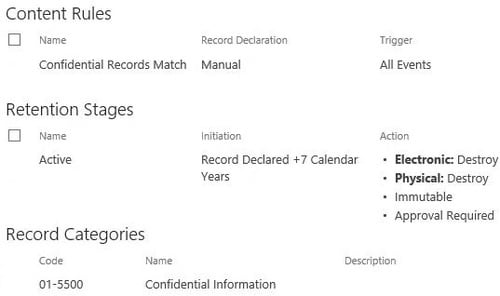
Now we simply have to assign our Content Rule to the desired Compliance Policy (or Policies) and link up the required Record Categories, and we have completed this part of the setup.
 Policy 1
Auto-Populate
The final step of our Confidential Records setup is the use of the Auto-Populate feature, which is designed to instantly populate a specified value to a SharePoint metadata column as soon as a Document has fulfilled a Content Rule and been matched to a Record Category.
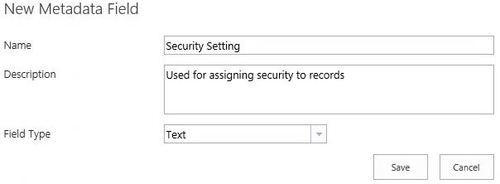
We must first create what is known as a File Plan Metadata Field. This is similar to the standard SharePoint Metadata Column, however it can only be used on File Plan objects, such as Record Categories.
Metadata Fields are found in the File Plan section of Lifecycle Management, and are created quickly. Simply provide it a name and choose the type of field it is, the same way you would set up a SharePoint Metadata Column.
 Metadata Field 1
Now that we have created our File Plan Metadata Field, we can add our desired Metadata Value to our Confidential Record Category and populate it to a SharePoint Metadata Column. Select your Record Category and click the Metadata Value button on the ribbon.
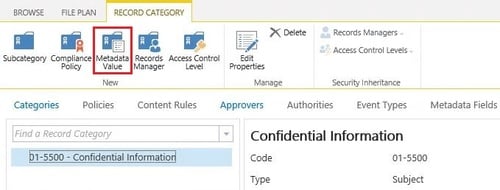 Metadata Value 1
Simply choose the Metadata Field that was just created and enter in the name of the Access Control Level that we set up in the first part of this article – the name must be exactly the way it is in the Access Control Level.
 Metadata Value 2
Next, check the Populate SharePoint Column box; this will allow you to choose which SharePoint Metadata Column you want to populate the value to. In this case, we want to choose the Metadata Column we set up for our Access Control Levels. Once this is done, we have completed our setup of automatic security based on Record Category for In Place Records.
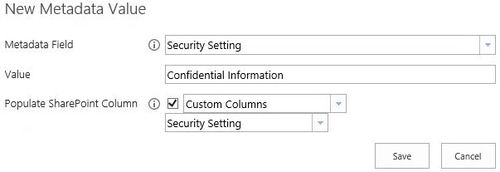 Metadata Value 3
Testing
As with any new setting that we put into Collabware CLM, it is always good to test it out before allowing regular users to start playing around in the system. The way to test our setup out is to simply fulfill the Content Rule, effectively Classifying the Document and auto-populating the Access Control Level. For the Content Rule shown above, this metadata would fulfill it.
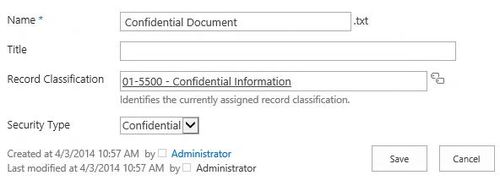 Metadata
Once you save this information, the Auto-Populate feature should add the extra metadata. Since our Access Control Level metadata field is hidden, we cannot see it, but it will still have the value auto-populated. In order to confirm that the security has been overwritten, simply check the security of the document.
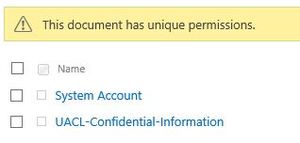 Permissions
As you can see, the security has been overwritten. The System Account must always be added, since it deals with auto-declaration and other Collabware CLM features, but for all intents-and-purposes, this document is now locked down to the users in your Confidential Information Access Control Level. Access Control Level based security persists whether this document is In Place or in the Record Center, so security never needs to be changed. However, SharePoint has a strict fifty-thousand unique permissions per site, which you may run into if you use this feature extensively. Keep this in mind when building your Content Rules.
Ultimately, this should not replace good SharePoint architecture and consistent Record Center security. For system-wide security, you must rely on the standard security measures. However, if required, this automatic security setting can be extremely useful on a smaller scale. Not only does it allow you to lock down Records that are kept In Place, it also removes the setting of security from the users, allowing Records and Information Managers to control security without having to rely on user-set values.